One of my most frequently asked questions – what embroidery machine should I buy? I wish there was an easy answer, but you want the best machine for you – not the one I like best. A few things to consider:
- What is your budget?
- What do you want to do with it?
- Are you comfortable with watching youTube and troubleshooting or do you think you would need more support than that?
The Babylock Solaris is a magnificent machine and the Viking Epic is truly epic – but they will both set you back north of $15,000. On the other end of the spectrum, a Brother SE400 (that is an affiliate link, click here to find out more) is $320 at the time of this writing.
There has to be something in between those, right?
A standard piece of advice is to get the biggest hoop you can afford. I would agree with that in large part. Hoop size is very important. Every embroiderer will bump into “hoop envy” at some point. Here you are, happily stitching your monograms and then someone has to put something like this in front of you and suddenly you “need” a bigger hoop.
I strongly suggest that people wait until they can afford at least a 5×7 (or 13ommx180mm) hoop. The Brother PE800 (that’s another affiliate link) is a very popular choice at this size and is usually in the range of $550 at the time of this writing. There are a few people out there who are perfectly happy with a 4×4 hoop and I take my hat off to them. The vast majority outgrow it very quickly when they realize that it is best suited to newborn items and monograms. Even a toddler shirt will look better with a 5×7 design. Many In the Hoop designs start at 5×7 because sometimes there is just no way to make it work smaller. If you can stretch your budget to a bigger hoop, you will appreciate it. Each jump in size opens more and more opportunities.
What else should I consider?
Are you an independent learner, comfortable with troubleshooting via YouTube and message boards? The machines I linked to above come from Amazon or another big box retailer. When you can’t figure out why all of a sudden you have more bobbin thread than colored thread on the top of your design, they won’t have a clue. They are not going to walk you through setting it up, threading it, choosing stabilizers and thread. Those are all things that you could expect from a good machine dealer. Most dealers will provide some classes to get you started and are there when you need a hand. Some also include free service for a year or two. That is a real value that cannot be overlooked. There are plentiful resources on the internet for learning to use your machine and tips and tricks of the trade. (Some are good, some will ruin your machine, but that is a post for another day!) If you are comfortable with seeking out solutions on your own, or if you do not have a dealer close enough to be of any help, purchasing online or from a big box retailer might be for you. As with any online purchase, be sure to know who you are buying from and what their return policies are if you get a lemon.
Why can’t I find prices online!?
Machines with hoops larger than 5×7 (other than Singer, but we will get to that) are generally only sold by dealers. Each dealer will have one or more brands that they sell and support. It is hard to give a price range for these machines because dealers do not advertise their prices. You must call or stop in (depending on the dealer) to see the machines firsthand and find out pricing.
OK, I’m going to visit the dealer, what should I look for?
A few questions you might want to ask the dealer, regardless of machine:
- Are any classes included?
- Are any other classes available that are not included in the price?
- Do you service the machines locally or send them to a central repair location?
- Is that the same answer if it is a warranty repair?
- How long do you generally have the machine when I bring it in for routine service?
- What is the warranty?
- Do you include any routine servicing in the price?
There are no right or wrong answers to these questions, but I feel it is good to know these things up front, rather than being surprised down the road. Some brands do all servicing at a few central locations around the country, others service locally, which can make a big difference in how long it takes and what your dealer can do for you on the spot.
I like to go visit, get a feel for prices, maybe pick up some brochures and then come home to research in depth.
Do I want an embroidery only machine or one that is an embroidery/sewing combo machine?
Some people feel strongly about having an embroidery only machine and it definitely has some pros:
- Lower cost
- You can sew on your sewing machine while the embroidery machine embroiders
- If your embroidery machine is misbehaving or is in the shop for service, you still have your sewing machine
- You do not have to switch anything over to go from embroidery to sewing and vice versa
Combo machines also have a few benefits:
- If you like to travel with your machine or attend sewing retreats, it is only one to move, not two separate machines.
- If space is an issue, that other machine can get in your way.
- A good combo machine costs less than a good embroidery machine + a good sewing machine.
- Some machines now allow you to sew with the embroidery bed still attached, so there is less changing over than there used to be.
What other features do I want to look for?
Hoops: Maximum stitch field, which is usually referred to as hoop size is often a major factor in the decision as we discussed above. Also ask how many hoops come with the machine. Some come with a 4×4 and the largest hoop that will fit. Others include one or more of the sizes in between.
Screen: These can range from a small LCD touch screen to an incredible 10.1 inch tablet like screen with lifelike colors and many steps in between. Having a color screen is definitely a nice feature. It makes it easier to see what step your design is on and the larger screens have other features.
Thread trimmer: All machines will stop and trim the thread at the end of each color. Some machines will automatically trim jump threads. Those are the little threads left on top of your work when the needle has to jump from one area to another. If your machine does not trim threads, you will have to cut each one, either between colors or at the end of your project. Trimming jump threads is one of those features that those moving up to a bigger machine get VERY excited about.
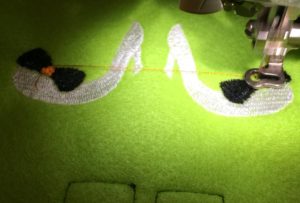 When the machine has to move from one area to another unconnected area, that is called a jump.
Higher level machines will trim that thread between the two shoes automatically.
With entry level machines, you will trim that with a scissor either between colors or after you are finished with your design.
Needle Threader: As far as I know, all of the single needle machines on the market these days include a needle threader. They are NOT all created equal! Ask the dealer to demonstrate this feature for you so you can see which one you like best.
On screen editing: Most machines will allow you to move the position of the design in the hoop and scale it up and down within limits and rotate in 45 or 90 degree increments. As you get into the higher level machines, some will have features that allow you to merge designs on screen, add lettering, resize, duplicate and other nifty things. The higher up you go, the less you will need software to prepare your designs before moving to the embroidery machine. Some machines even advertise that they can turn your images into an embroidery design, right on the screen. Take that one with a grain of salt, it is a rudimentary auto-digitizer, which is also a post for another day! One even lets you watch instructional videos onscreen.
Built in designs: Every machine will include some number of built in designs. Some brands have exclusive deals – Babylock has Nancy Zieman designs built in and Brother has an exclusive deal with Disney. It is important to note that those designs are for personal use only, so sadly, you aren’t going to make your fortune selling Mickey burp cloths – but you can make a darn cute gift for that child in your life who is just crazy for Pooh Bear. Other than that, the included designs are nice, but they are nothing compared to the wealth of designs available to you on the internet. Personally, included designs have never been enough to sway me from one machine to another but it can be a big selling point for the Brother machines if Disney designs are important to you. They are the only legal source for Disney.
Auto tension vs manual tensions: Tension is critical in embroidery – you don’t want that white bobbin thread showing on the top of your project or loose loopy satin stitches. Some machines will have technology to automatically adjust tensions to accommodate the fabric that you are using. On the more entry level machines, the user will adjust the tension if needed. It is something that each brand will believe theirs is the best available. They are all pretty great.
Lighting: The number of lights and how bright they are will vary from one machine to another. If your eyes are getting old and tired like mine, this might influence you – or you could get a great clip on light.
Transferring designs to the machine: There are a few machines on the market that require that your machine be connected to a computer to run. The computer acts as the brains of the machine. Read the reviews of these machines carefully if you are considering one. They are priced quite low, but can be quite challenging for a beginner to master. Most machines will transfer files via a USB stick or by hooking up a cable between the machine and the computer to transfer the file and then the cable can be disconnected. We are just starting to see wi-fi enabled machines and I would guess that will become more common in the future.
Bobbin: Like a sewing machine, an embroidery machine uses a top thread and a bobbin thread. Unlike sewing, you usually do not match the top and bottom thread. In general you will keep white thread in your bobbin. Some machines now use larger bobbins, which lets you go longer between switching out your bobbins, which is great! That comes with a trade-off though and is worth asking about. Is the bobbin a standard size that I can pick up at my local sewing shop or is it specific to this brand or machine, meaning that I likely have to purchase from a dealer? What do the proprietary bobbins cost compared to generic? Can I use prewound bobbins? (Those are a HUGE time saver and convenience).
Come on, you really don’t have a favorite?
Personally, I really like the Babylock and Brother machines. I have a FANTASTIC Babylock dealer practically in my backyard who services the machines locally. The machines just make sense to me and have been SUPER reliable. I am also a big fan of the new Bernette 70 series machines – the features they have for the price is incredible. Others will tout Husqvarna Viking’s bigger hoops and more features for your dollar. Janome and Pfaff are well loved by many of my customers. Bernina machines are quite expensive, but if you are a quilter, they may be your favorite brand. You may have noticed that the Singer machines didn’t come up. They are definitely the least expensive way to get a 6×10 hoop. They are also notoriously challenging. Like every brand, there are those who love them. While affordable and a great option for a slightly bigger hoop they do take a lot of patience and are not recommended for first time embroiderers.
My observation over the last several years has been that the Brother PE 770 (there’s that affiliate link again) is incredibly popular with beginning embroiderers, for good reason. It is a good basic machine that does not have all the bells and whistles, but has a 5×7 hoop and stitches very nicely. It is a solid machine and a great way to find out if embroidery is your passion and worth investing in a higher end machine.
You can learn more about the various brands and the machines they offer on their websites
Brother
Babylock
Husqvarna Viking
Janome
Pfaff
Bernina
Bernette
One last tip
Many dealers allow customers to trade in their old machines towards the purchase of a new one. They then take the older machines, tune them up and offer them for sale. Some even include a warranty. This can be a great way to get the features you want at a lower cost and still get some of those benefits of buying from a dealer.
I know, you clicked on this hoping that I would tell you exactly which machine to buy and where to get it. I’m sorry that wasn’t the case, but I hope I helped you along the path to choosing the best machine for YOU.
Once you find the machine of your dreams, be sure to come back and pick up some fun designs at A Creative Medley and join our Facebook Group and Newsletter for discount codes and the latest news on new designs and ways to save